How to use Google Ads
As you here you have likely already made the decision that running a brand or keyword campaign on Google Ads is a good idea.
This article will take you through setting up a Google Ad brand campaign on Google Ads.
In this article we take you through a 56 steps on what to do to set up your Google Ads Brand Campaign as well as provide you with information around each decision that you need to make and why.
However, you can use this guide for a keyword campaign on Google Search.
This guide will hold your hand step by step through every decision making it easy to understand how to create a Google Ads Search campaign.
Table of contents
- Getting started setting up your first campaign
- Choosing the right location and setting it up
- What language should I use?
- Audience
- Budget
- Delivery Method
- Bidding Process
- Conversions
- Ad Schedule
- Ad Rotation
- Ad Extensions
- Keywords
- SKAGS – Single Keyword Ad Groups
- Writing your first Ads
- Conclusion
Getting started setting up your first campaign
Google provide five different types of campaigns to choose from.
Below we summarise each and what each do, however, if your using the walkthrough to build your first campaign you can choose to ignore that section.
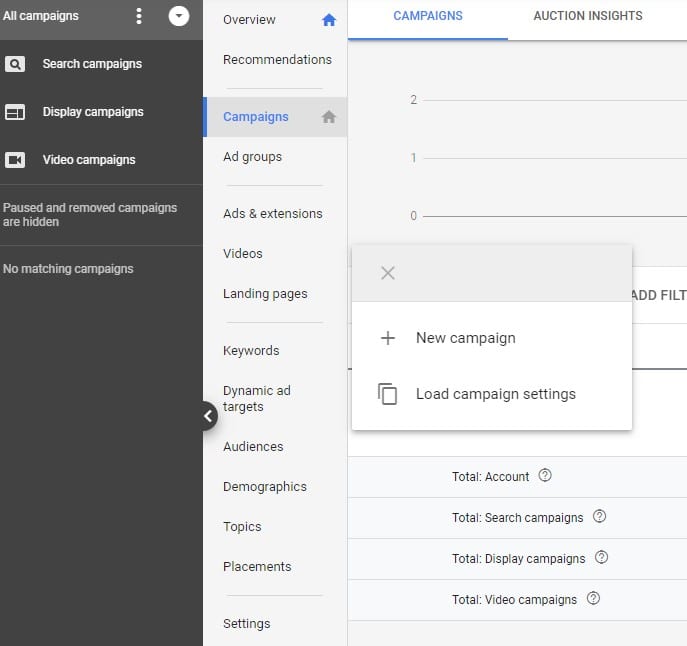
1. To get started log into your Google Ads account
2. Then click “Campaigns” from the grey navigation
3. Then click the plus symbol in the blue circle
4. Then choose “+New Campaign”
Yes we agree it’s a long process just to choose a new campaign.
Now you should have a similar view to what we have in the screen shot below.
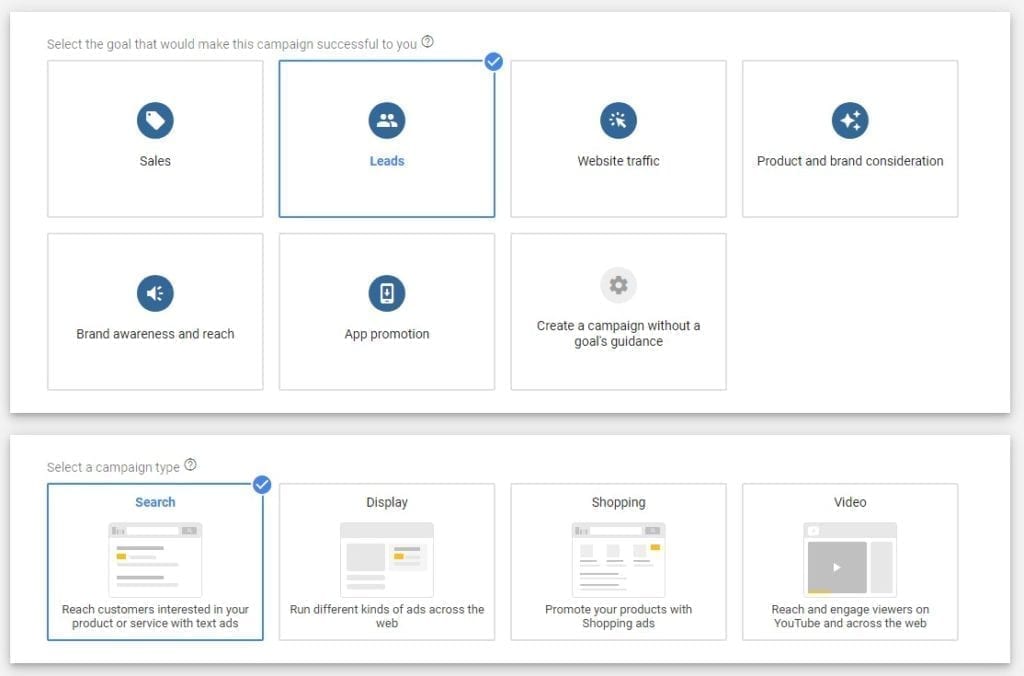
For this walk through we are creating a brand campaign targeting the keywords related to our brand. In the screenshot below you will see that Google provide a box called “Product and Brand Consideration”, however, as we are targeting keywords in Search, we won’t choose this box and we will choose “Leads”.
We also won’t choose “Brand Awareness and Reach” for the same reason.
If you do select Brand Awareness and Reach OR Product and Brand Consideration, you won’t be given the choice in the next box for Campaign Type – “Search”
Both of these categories focus on display and video ads rather than keyword search on Google. For further explanation see the section below that describes each of the five types of advertising networks on Google Ads.
5. So Select the “Leads” Box
6. Now select “Search” from Campaign Type.
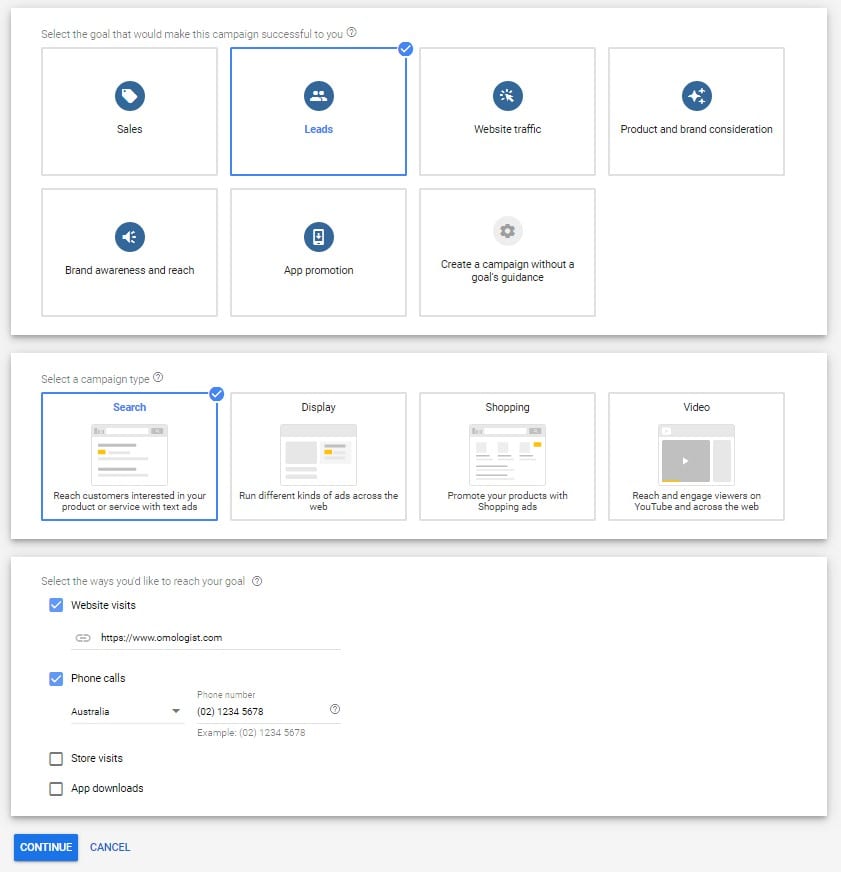
The next choices just drive the guide that Google has built to ensure they offer you the correct choice of feature for what you want to do.
We will just consider the first two choices, website and phone number. As this a brand campaign targeting keywords, when a person clicks you will likely want them to visit your home page.
In addition you should add your phone number. If you are a local company just enter the number you use for your business.
However, if your setting up a brand campaign in different countries make sure you use the phone number relevant to that country.
7. Click the check boxes next to “Website Visits” and if you like “Phone Calls”
8. Type in your URL under “Website Visits”. For us this is “https://omologist.com“
9. Type in your phone number
10. Click the Blue “Continue” button at the bottom of the page
Naming your Campaign
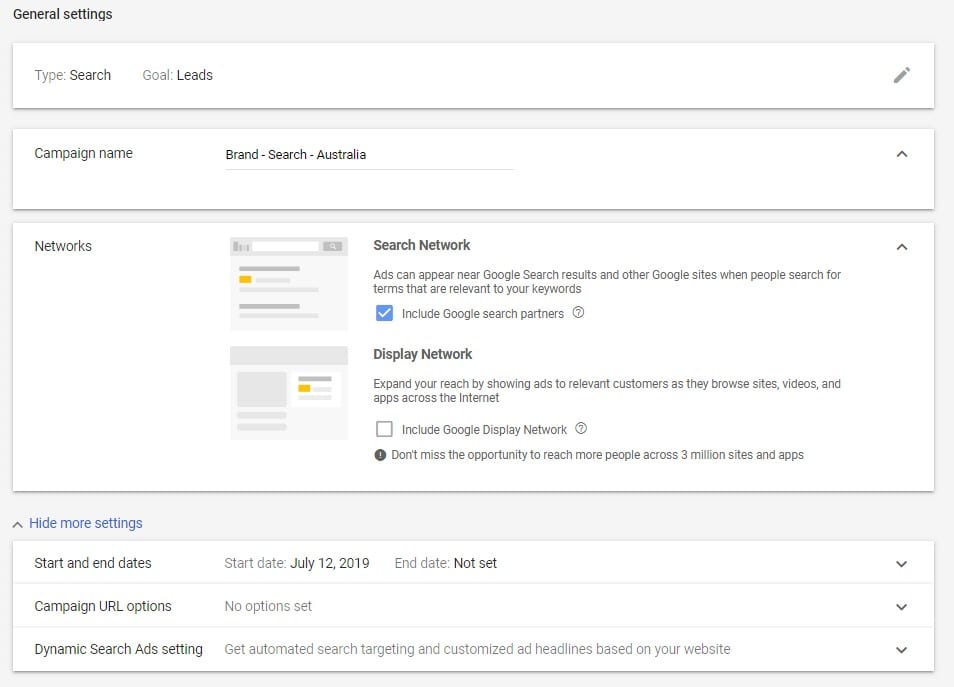
We need to name this first campaign, confirm our choice of advertising network to target and consider any other settings.
To name your campaign you will want to use a common convention across all your campaigns so that you know what each campaign does.
For example let’s say you were setting up a brand campaign for Australia, US and the UK.
In this case you may have three campaigns and call then “Brand – Search – Australia”, Brand- Search – US” and “Brand – Search – UK”.
So the name lets you know these are brand campaigns, that your targeting search and the country your targeting.
If you advertising in different states you might change the country labels for state labels. In the future if your setting up a display brand campaign you might then call then “Brand – Display – Australia” or a video campaign call it “Brand – Video – Australia”.
11. Next to “Campaign Name”, highlight the default name created by Google and type in a campaign name that makes sense to you.
As we are setting up a brand campaign targeting keywords on Google the first choice is easy which is to uncheck the display network. It is always best practice to set up display campaigns separate from search campaigns.
12. Uncheck the box under “Display Network”
The next decision you will be get people in either camp and that is to “Include Google Search partners” or not. Google Search Partners are Google websites other than Search, such as YouTube, as well as hundreds of other websites that partner with Google.
Unfortunately there is no definitive list that they provide but they do keyword based advertising. Also if you do advertise on Google Search partners the CTR data does not impact your quality scores for Google Search.
So should you choose Google Search Partners?
There is no definitive answer as it will depend on your brand and product and service.
We would recommend you run a test.
Run your ads with it turned off for one month and then turn it on and run the campaign for an additional month and then compare the results.
This way you can make a definitive decision based on your brand.
Further it is not always the case, but often CTR is Google Search partners can be lower than on Google Search and it can also be cheaper.
If you are concerned that the lower CTR might impact your Quality Scores, you don’t need to be concerned as CTR from Search Partners does not impact Quality Score – See Google on this.
More on Quality Score later in this article.
13. Based on your choice, either leave Google Partner Network Checked or uncheck it.
14. Now click “Show More Settings” at the bottom of the box.
You can ignore these settings as we will talk about those in future articles and they don’t need to be used for this campaign.
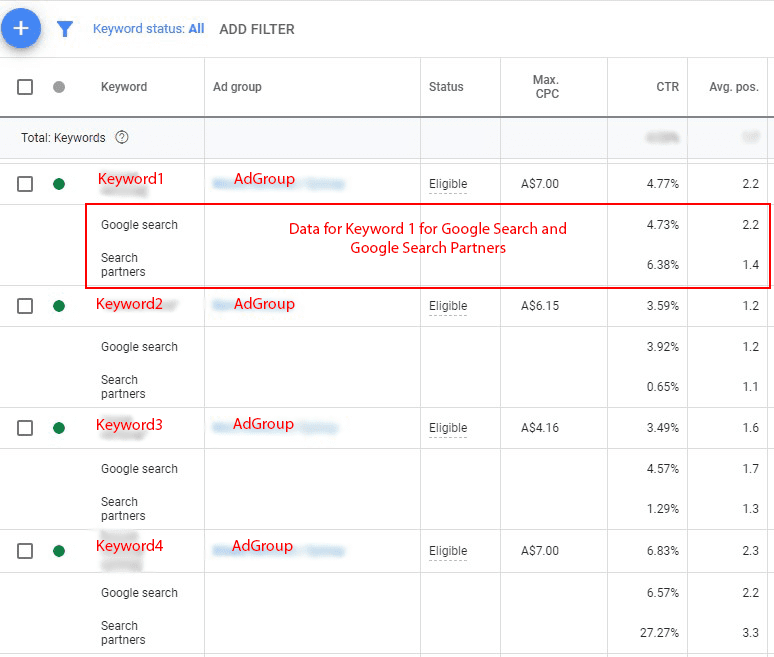
Analyse your Google Search vs Google Search Partners results.
If you do run a test and want to analyse your data, click on “Keywords” for a campaign, and just follow the steps below to show the data.
Next click on the “Segment Symbol” in your filter (see image below) and then choose “Network (with Search Partners)”
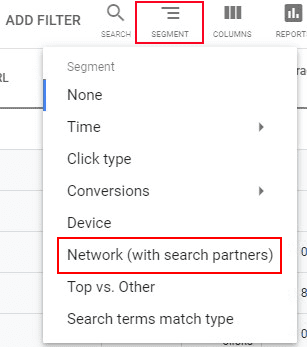
Once you do this you should see results similar to that below, breaking out keywords and showing the different CTR’s, Average Positions and other data so you can do analysis to see if Search Partners is working for your keywords.
On start and end dates
We generally don’t use these unless your running a seasonal campaign, or limited time offer type campaign.
For a brand campaign if you want to stop the campaign you would generally just pause the campaign. Then turn it back on when your ready to run it again.
15. Now scroll down to targeting and audiences.
Continue the steps for setting up your brand campaign in the next section
Choosing the right location and setting it up
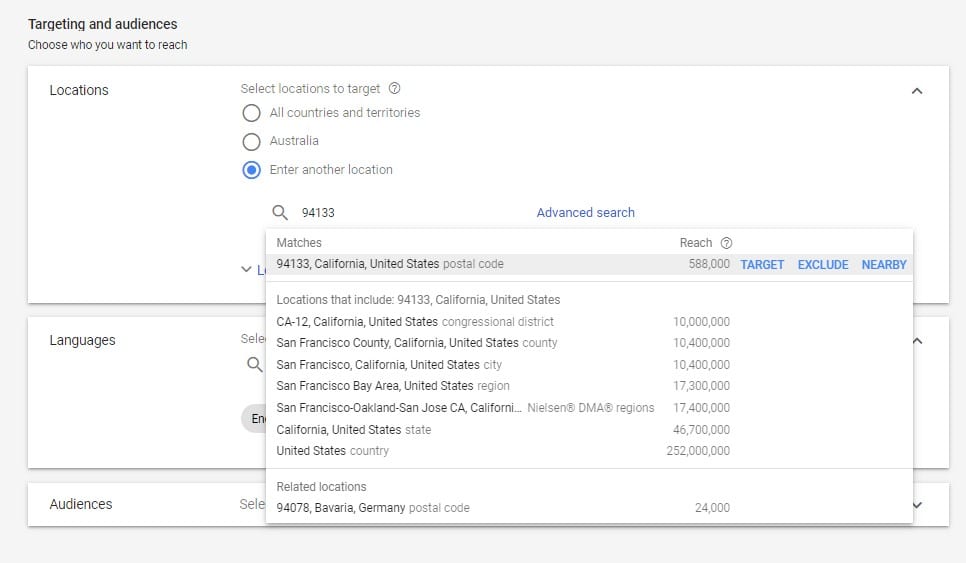
Setting the location
Google Ads provides a lot of functionality for choosing the location you want to target.
Before following the guide steps we would recommend you read through this section and make a choice on the best way for you to choose your location for your campaign and then follow the relevant guide in that section.
Taking the time to think about location can save you money.
Google provides a number of ways to target locations. You can target by country, region, state, postcode, zip code, county radius and / or pin.
So thinking about how you target this campaign relative to other campaigns is important.
For example, in the previous section we talked about the naming convention for campaigns.
If you have chosen a country for this brand campaign you will want to type in that country as your target and then set up other campaigns to target other countries.
16. In the location box check the dot next to “Enter another location” and then in the section directly below with the magnifying glass, type in the location you want to target and Google will show you some options.
Using “Nearby”
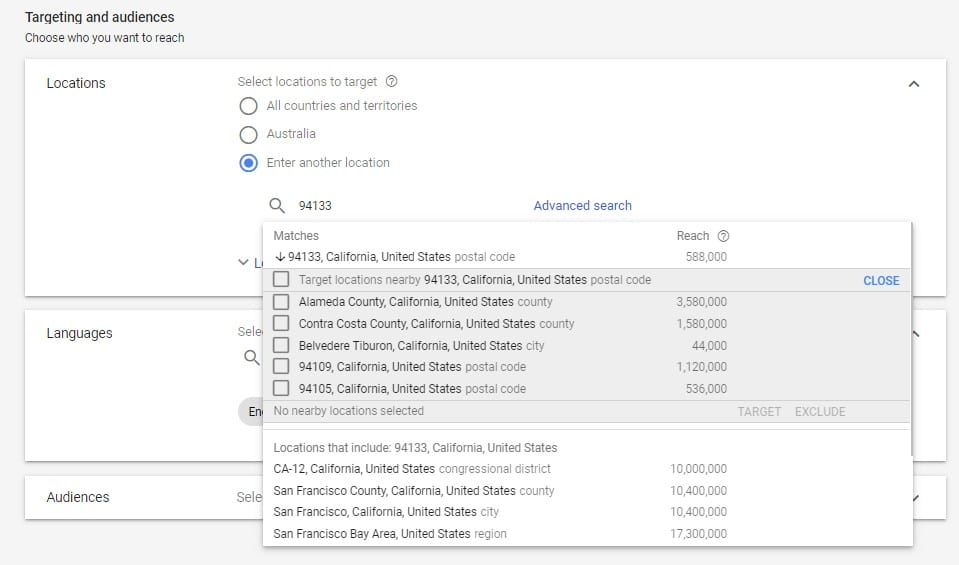
If your a local business you may only want to advertise in particular suburbs so using zip code or postcode to select different suburbs would be the best way to target.
You can do by typing a zip code or postcode or typing the name of the suburb.
It may not make sense to advertise across a whole city of you can’t service those areas so choosing target suburbs or a state or region will make more sense depending on the size of your business.
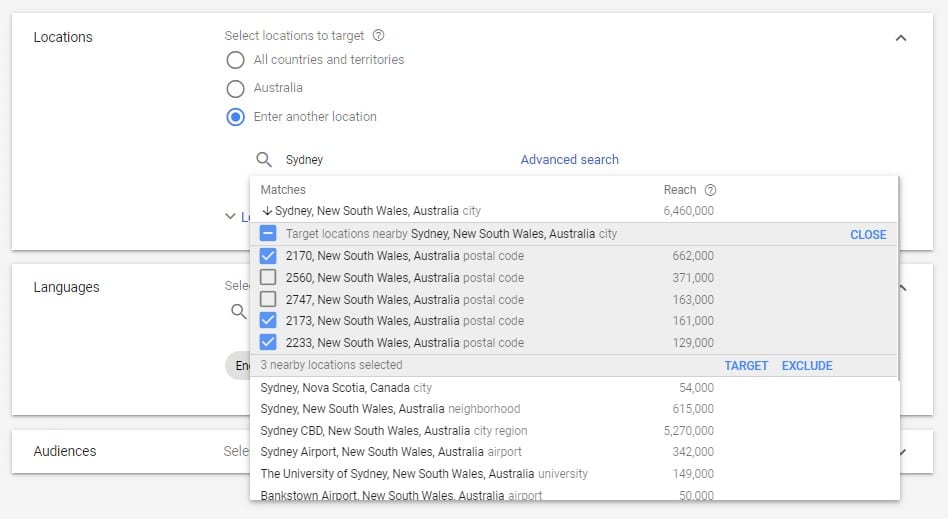
To find nearby suburbs or counties you can also type in say a suburb and then click “nearby” and Google will show you those suburbs, counties, zip codes postcodes etc that are nearby.
17. To find “nearby” locations type in a location and on the right click “nearby” and Google will provide a list of nearby locations which you can choose from.
18. Check the relevant boxes and then click “target”.
Using “Exclude”
Google also provide the mechanism to “Exclude” locations from ad campaigns.
This means you ad will not be shown in the location you exclude.
For example let’s say you want to target a large city but you don’t want to advertise in the CBD. You could target the city location and then use the exclude function to exclude the CBD area.
Another example you may want to target a state for an ad campaign, but then use the exclude function to exclude major cities from your campaign.
To exclude a location type in the location and move your mouse over the name to the right until you see “exclude” and click.
If you want to exclude a number of nearby locations you can do this by typing in a location and then click “nearby” and then check the boxes next to the locations you want to exclude and then click “exclude”.
19. To “exclude” a location type in the location and then click “exclude”.
Using the map to choose locations
Now that we know the basics around adding locations, targeting locations and excluding locations, we can now look at how you can do this using the map.
What’s great about this is that you can visually see locations on the map and you can quickly choose to target or exclude locations.
This feature is great if your building a targeted campaign / building a campaign for local area marketing.
Google breaks areas around the world into zip codes and postcodes, states, counties, suburbs, regions, areas countries and more so there is a lot of flexibility.
In the Omologist platform we can provide SERP data for every area that Google uses in their Google Ads locations. To learn more try the Omologist platform.
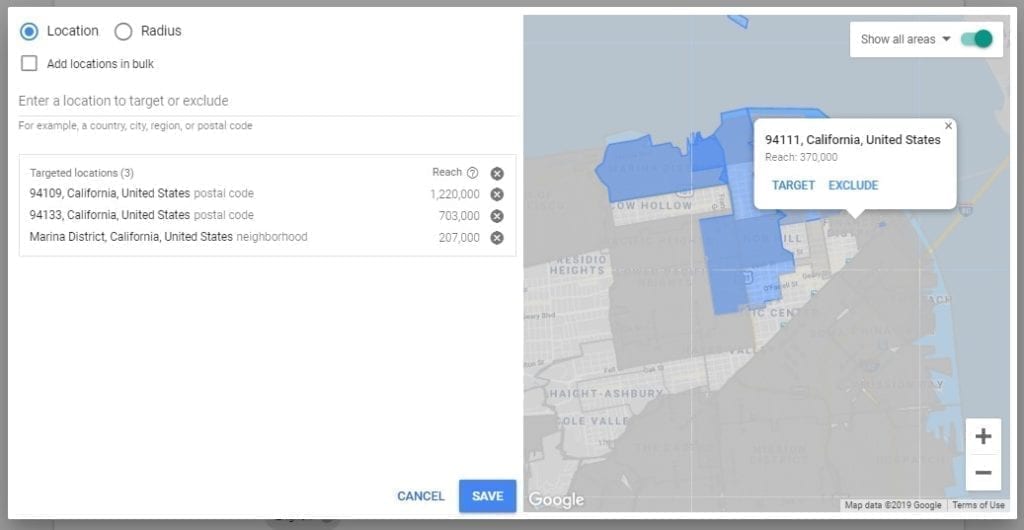
20. To use the map version to select locations, next to the box you type in a location, click the link “Advanced Search”
21. Before you start typing in locations, on the top right corner of the map you should see a small slider called “Show All Areas”. Make sure this is green for turned on.
22. Next type in a location on the left side to start with a central location for your targeting. If you already had a location chosen the map should already be visible.
23. You should see a number of grey areas on your map outlined. These are areas designated by Google. You can click on these area and a small box should appear as you can see in our screenshot above and this will allow you to target OR exclude an area.
24. As you “add target” locations, these will turn blue. As you “exclude” locations these will turn red
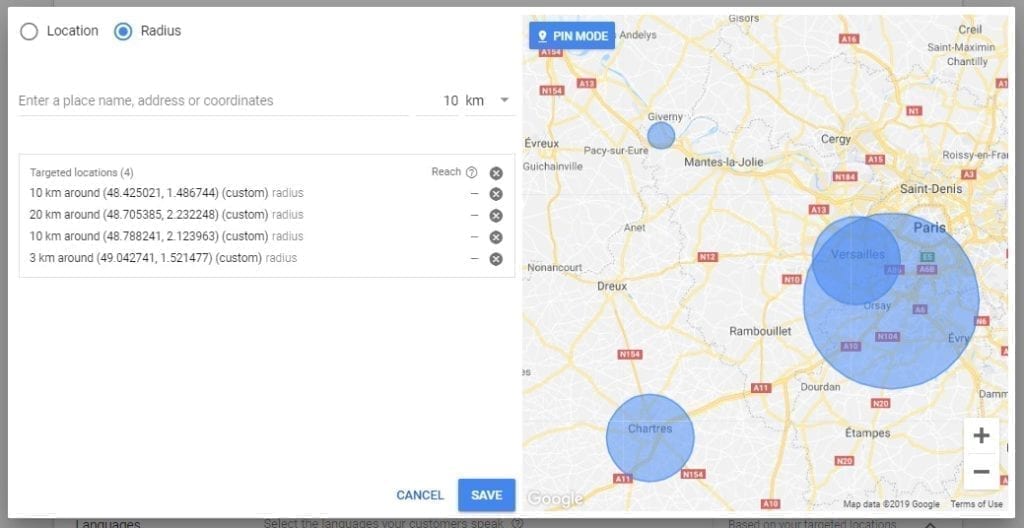
Using “Radius” for location
Radius is another method to choose locations you want to target your advertising.
It has lots of uses, however, to give you an example, lets say your a local business and your home is the office.
From home you are happy to travel 20 miles in any direction to do jobs.
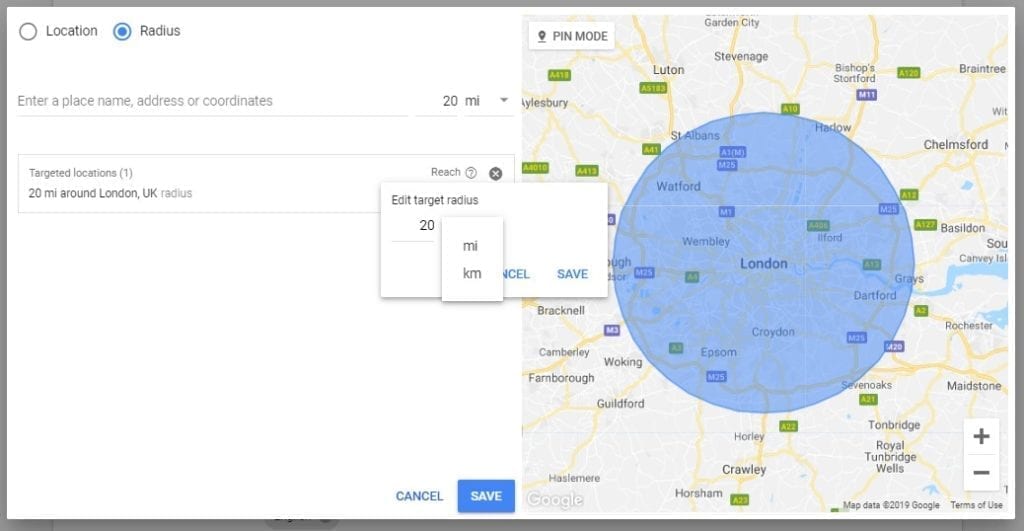
In this example you could choose the location as your suburb and set the radius at 20 km.
In the example above we used London and set the radius at 20 miles but as you can see from the image you can also change this to kilometres.
You can also edit the distance as well and you can use anywhere from 1 to 500.
A negative of using this feature is that you don’t know what the reach is.
So if you want to understand the reach you would be better using location rather than radius.
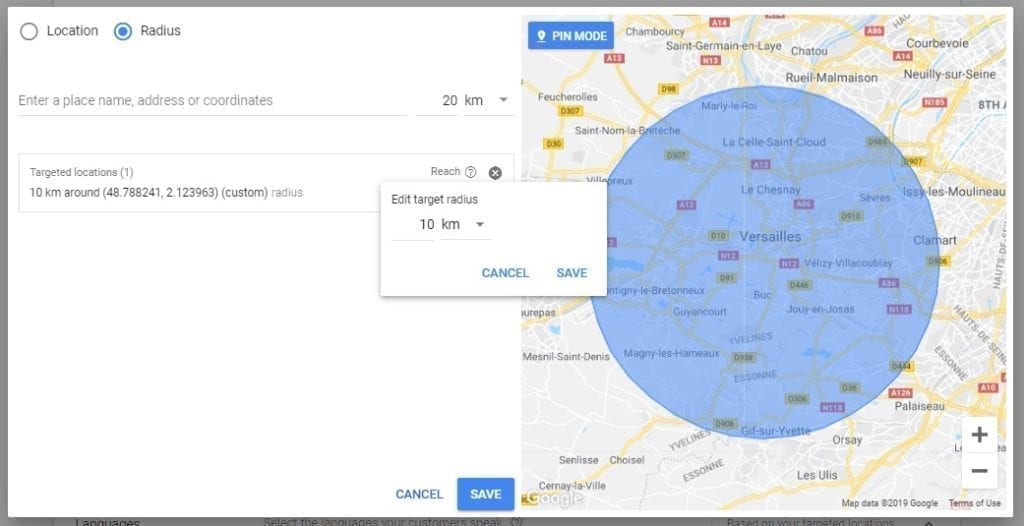
25. To use Radius click “Advanced Search” to bring up the map and then click “Radius” on the top left of the box.
26. Generally we like to set the miles / kms first as the distance we want to use. We do this only because once you type in a location and click enter it will use the default of 20.
27. Next type in the location you want to be the centre point for your circle.
28. The map should then show a circle based on the distance and location you chose. The distance is editable by clicking the little pen symbol next to the target location in the list and you can change this to anything between 1 and 500.
Using “pin mode” for location
Using “pin mode” is very similar to using radius.
The only difference is that rather than type in a location to create the radius, you simply point on the map with your mouse and click “target”.
As with radius, pin mode does not provide reach data.
29. To use pin mode, click “Advanced Search” on the location menu and then click “radius” on the top left.
30. On the map click “pin mode” on the top left of the map area.
31. To choose a location click the map and a grey circle should appear to show the radius. Click “target” to target that radius.
32. As with radius you can change the radius of the circle in pin mode by editing the distance between 1 and 500 by clicking the pen symbol next to the target location on the left.
33. Unfortunately you can’t exclude areas with pin mode, only target locations. To exclude an area you will need to use location.
Targeting options
With “Target” Google provides some additional features to ensure you target the right person. The choices you get are listed below.
- People in, or who show interest in, your targeted locations (recommended)
- People in or regularly in your targeted locations
- People searching for your targeted locations
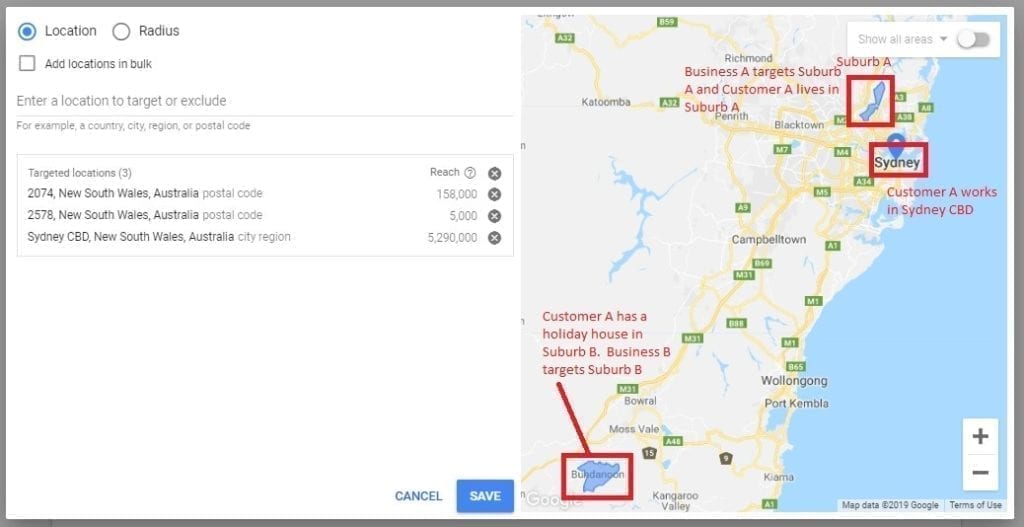
To better understand these choices we are going to create Customer A who is the person who will be searching on Google.
We will have a Business A that targets Suburb A with Google Ads.
We will have a second Business B that targets Suburb B with Google Ads.
Customer A works in the CBD of a major city.
Customer A has a home in Suburb A and a holiday house in Suburb B.
Using Sydney we have tried to depict this on a map.
People in, or who show interest in, your targeted locations
If you make this “recommended” choice in your targeting this will generate the most impressions of your ads.
This choice targets all types of scenario’s where the other two are subsets of this target scheme.
To understand how this works, Customer A is at home in Suburb A and does a search for the type of Business A and B do as in this example they are both for example cake shops.
In this example Customer A will see Google Ads for both Business A and assuming they have searched around their holiday house area previously (“shown interest”) also for Business B.
Also if customer A is at their holiday house in Suburb B they could also see Google Ads for Business B and Business A. They would also see ads for a similar business in the CBD.
So while location choices are important, Google using recommended targeting can also show ads to people outside your target location with this choice as you are either in that Suburb (target location) or have shown interest in that target location because you have a holiday house there and often visit the location.
So why would you choose this option?
If your a business operating in a Suburb you want to show your Google Ads to all your potential customers. As we see in our example, Customer A lives in Suburb A and if Business A is a cake shop they may want to show ads to Customer A when they are both at home and at work.
People in or regularly in your targeted locations
This choice to target will narrow your target audience.
In this choice, if Customer A spends all week at home in Suburb A and all weekend in Suburb B, then Customer A would likely see Google Ads from both Business A and Business B whenever at Suburb A or B.
However, if Customer A rented their holiday house out permanently and therefore never got to use that house, it would be unlikely that Customer A would see ads for Business B as Customer A is not IN or REGULARLY IN Suburb B.
Also its important to note that by being ‘in or regularly in” means physical presence and not searched in that area.
For example if Customer A was physically in Suburb A, had never been to Suburb B and searched in Suburb B, but Business B targeted only “people in or regularly in” Suburb B, Customer A would likely never see a Business B Google Ad.
To cover people searching a location from another location (Suburb A searching in Suburb B), you need to choose “People in, or who show interest in, your targeted locations” or the next choice “People searching for your targeted locations”.
So why might you choose this option?
In this target choice we want to show ads to people who are physically in these locations. If businesses A and B were plumbers it would make sense for you to want people who live in a Suburb or visit regularly to see your Google ads.
However, as hiring a plumber to do a location job is important a Business in either location may not want to show their ad to someone who never visits the location. However, as we saw with our examples this may not be a good choice.
If Customer A rents their holiday house out long term they are not regularly in Suburb B so they will not likely see ads but as they own the house they may still need a plumber in Suburb B and in this scenario Business B would not likely get this job as they do not target Customer A.
People searching for your targeted locations
This target choice lets you target people who are searching in the location you target to show ads so long as they specify the location.
However, if a person does not specify the location in their keyword search, Google will only show your ads to a searcher if they are physically in the location.
Using our examples.
If Customer A is in Suburb A and does a Google search targeting Suburb B by mentioning the location then they would see Business B’s Google Ads even if they are in Suburb A.
However, if they do not specifically mention the Suburb B location they won’t see Business B Google Ads unless they are physically at Suburb B.
So why might you choose this option?
An example of when to use this target choice might for a holiday home business.
Lets say Business B runs an Airbnb hosting business and may only want to show ads to Customers who target that area with keyword searches related to renting a holiday house in Suburb B.
If you live in a Suburb B, you would be only possibly search for holiday houses using those keywords if you were trying to find somewhere for a friend or family member to stay.
Business B would be interested in targeting you as well as people outside of the location who want to find a holiday letting in Suburb B.
While Customer A could see Business B Google Ads when they are in Suburb A, it would be unlikely unless they are typing keywords into Google with the intent to rent a holiday house, even if they visit Suburb B each weekend.
34. Make your choice on the type of targeting that makes sense for your campaign. If you are still not sure, go with the default – “People in, or who show interest in, your targeted locations” as this is the most common choice and makes sense in most scenarios.
Preferences for excluding targets
Just like when you choose to target a Google Searcher, Google also provides the ability to categorise those you exclude in your targeting.
The choices you get are
- People in, or who show interest in, your excluded locations (recommended)
- People in your excluded locations
In short the choices for exclusions are “everyone in the excluded target location” or “only those physically in the excluded target location.
The default will be “People in, or who show interest in, your excluded locations” however, if you only want to exclude those physically then make the second choice.
So how would I use this?
If we go back to our example the Airbnb host management provider who is Business B in Suburb B.
Business B may choose to exclude their Suburb B from showing their ads to people physically in Suburb B as all their potential customers may always come from other locations.
35. If you have chosen to exclude any locations, you can choose the type of Google Searcher who will be excluded from seeing your ads in that location – everyone or just those physically in that location. If you do make a choice the default is to exclude everyone.
What Language should I use?
Language you choose should depend on the product or service your selling, the country your in, the language used on the landing pages your targeting and the language you expect to use when creating the ad, and of course the keywords your targeting.
We strongly recommend that if your targeting multiple languages then set these up in different campaigns.
Also if you do target different languages please add the language to the name of your campaigns as we discussed earlier.
For example if you targeted English and Italian for a brand Campaign in Australia, your two new campaign names would be “Brand – Search – Australia – Italian” and “Brand – Search – Australia – English”.
The key point being to have a standard naming convention that helps you understand what each campaign is.
Why do I use different campaigns?
- You will need to target keywords in different languages
- Your ads will be in different languages and you don’t want to show an Italian language ads to an english speaker or vice versa.
- You will likely have different landing pages for different languages.
- If you want to target a language put the time and effort into creating a well thought through campaign focused on that language as you pay for EVERY click.
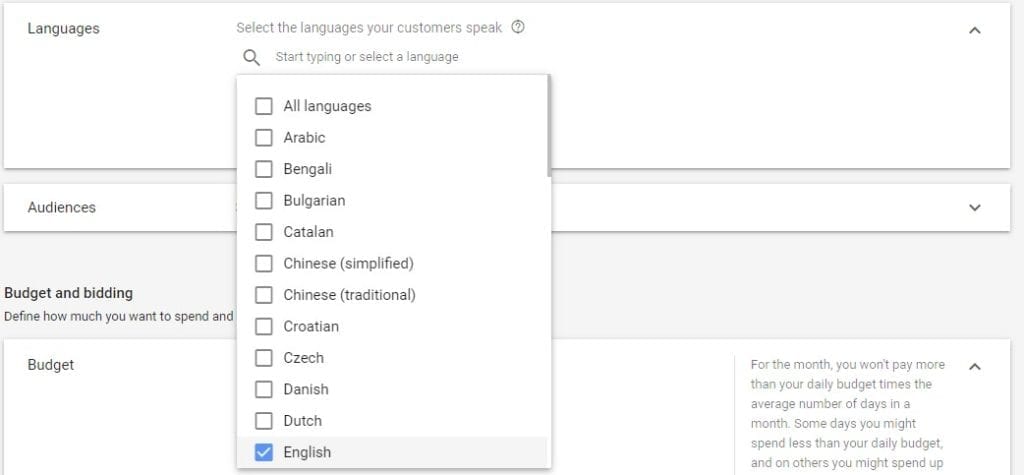
36. Choose a SINGLE language for the campaign. Never, never, never choose all languages!!
Audience
There is a lot that can be done with audiences and we will cover this off in a future article.
However, for the purpose of this “Brand Campaign” we can get away with not focusing our Campaign and narrowing our audience.
The focus will be on the keywords we choose for our brand.
If someone is searching for your brand we probably don’t want to narrow that focus at this stage. We want to see what and who searches for our brand and who clicks the ads.
In the future however, once we analyse the data there may be a reason to use audience to focus who sees our ads.
37. For this brand campaign for now, ignore audience.
Budget
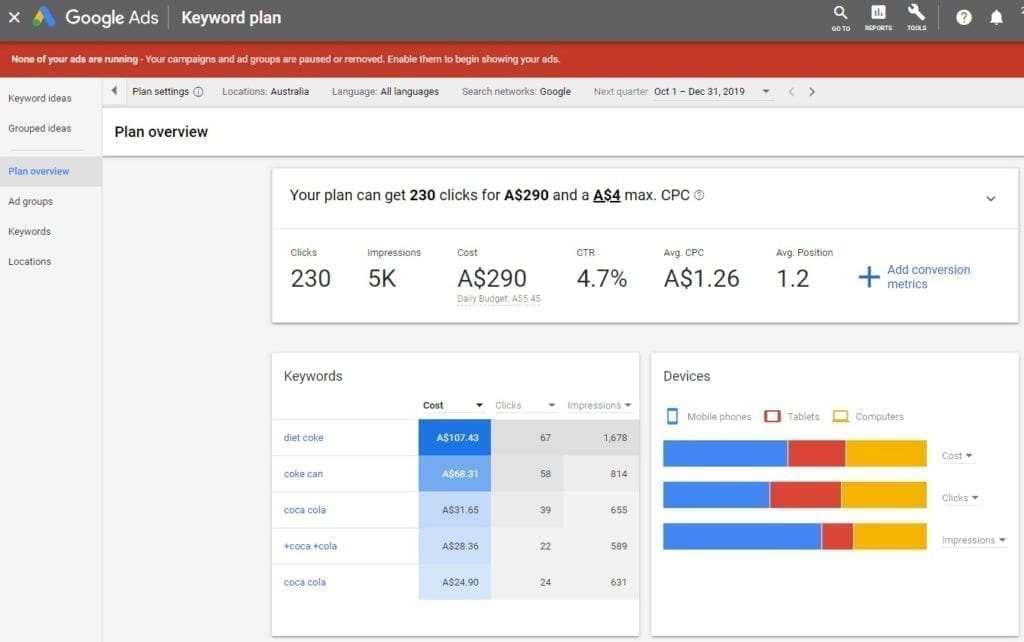
With Keyword planner you can type in your brand keywords and get an estimate on the number of searches historically that have taken place and therefore generate an estimate of daily budget.
In the example above keywords related to “Coca Cola”, Google estimates $5.45 per day for Australia for just Search (not including Google Search Partners).
38. To open the Google Keyword Planner and estimate the budget Google Believes you should use.
In Google Ads, at the top of your screen click Tools > then right click on Keyword Planner to open in a new tab and not lose all your work to date.
There are numerous ways to look at budget and adjusting your budget is a key component of any Google Ads campaign.
In addition to the information you now have from the Google Keyword planner now you will want to consider
- What is the maximum you want to spend / afford to spend per day?
- Do you want to share that budget across all campaigns or just this campaign?
Using shared budgets. Please ignore for now but you can apply a budget across your whole account or selected campaigns.
If you already have a shared budget setup you can choose to use that now.
However, in this setup we will use a dedicated budget.
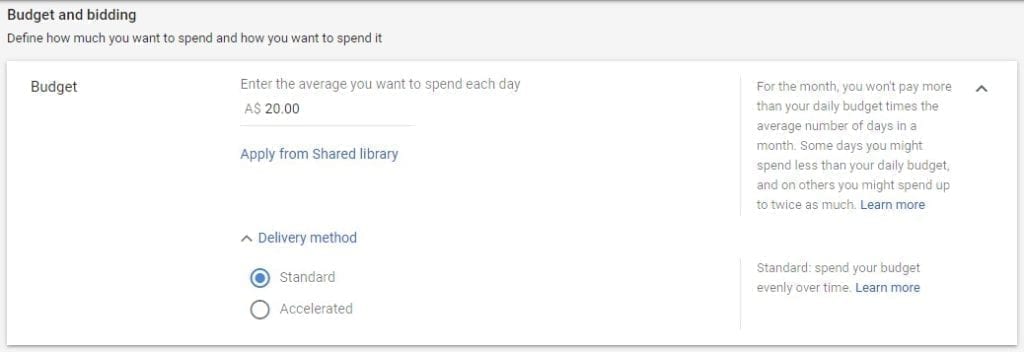
39. For this campaign we will use a dedicated budget. So next to the currency symbol under budget, type an amount you have decided upon to spend on a daily basis.
Delivery Method
Delivery method means how quickly Google will deliver your ads (put in front of) Google Searchers.
If you choose a standard delivery your ads, Google will attempt to optimize and show your ads evenly over the period of time you have chosen to show ads each day.
It means that your ad will usually not be seen each time a keyword your targeting is typed into Google, just sometimes to ensure it is evenly distributed during the day.
If you choose accelerated your ad will be less optimized and will likely be seen each time a keyword your targeting is typed into Google each day or until your budget is exhausted on a given day.
Google will argue that most people should use Standard delivery.
However, if your trying to understand the capability of a keyword you would be better to use accelerated.
Let’s look at an example
For a business like a plumber or electrician, people might tend to search for these trades first thing in the morning.
As expected your competitors start advertising at 6am each day then you will have lots of competition until their (and possibly your) budgets run out.
Keyword costs will likely be higher due to more competition for the keywords and the number of keyword searches taking place might be higher.
On the other hand we have had clients who get more ads shown in the afternoon and evening because their competitors use accelerated delivery but clearly use up their budget by lunch time or early afternoon.
They end up with customers calls all through the day and a lower cost per click but don’t get as many calls in the morning.
But as the morning might be when people are mostly searching those keywords so you want to get your ad in front of as many people as possible.
However, you will likely need a larger budget and will have more competition in the morning vs using standard delivery and showing ads more evenly through the day.
So the answer is not always clear as can be and will depend on your brand, product and service, business model and what your customers behaviours are and of course how much budget you have.
Our preference is to use accelerated and ensure you have enough budget to cover the times when your business is operational (ie business hours or 24/7 if that is your preference).
More on ad scheduling coming up so just keep in mind what your goal is for showing ads.
40. Make your decision to use standard delivery or accelerated delivery by checking the box. You can always change this in the future.
Bidding Process
In order to talk about bidding we need to have a short discussion on how Google determines the position of your ad.
Until recently, Google would determine you ad position on the basis of Ad Rank.
Ad Rank is a simple concept being your Bid (price you will pay for a click) times Quality Score which is a score determined by Google made up of Ad Relevance, Landing page Experience and Expected Click thru rate (CTR).
Quality score is a score out of 10 made up of these three factors.
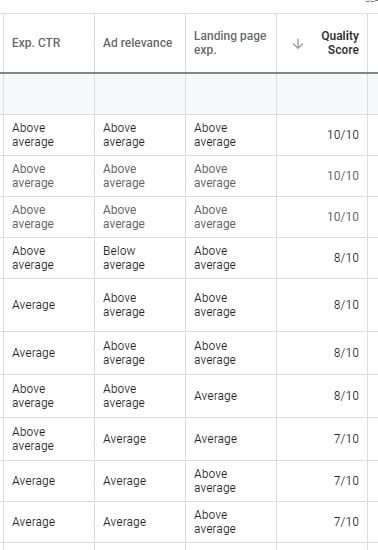
If you have an active Google Ads account you can see your quality scores as well as the scores for Ad Relevance, Landing Page Experience and Expected CTR by clicking keywords under Search OR for a search campaign and ensuring those data columns are added.
But how does Ad Rank work?
So if you had two people bidding on a keyword and person 1 had a bid of $5 and a quality score of 5 out of 10 then their Ad Rank is 25.
Person 2 might have a quality score of 10 so they could bid as low as $2.51 and have an Ad Rank of 25.1 which would beat person 1 with the higher Ad Rank and therefore get position 1, even though they bid almost half of what person 1 bid.
Today the process is more complicated as Google has introduced three new factors but limited information on how they impact the auction and the position of your ad.
The three factors are adrank thresholds, searcher context, and the expected impact from ad formats and ad extensions.
More on this in the future articles but for the exercise of this article if you want more information its best to get that from Google.
You can read up on Googles explanation of how ad position is determined here.
Below is a summary of the bidding strategies but there is more to bidding which we cover in our article a Guide to Google Ads Bidding Strategies.
So ok what are the bidding strategies?
Here is the list of bidding strategies
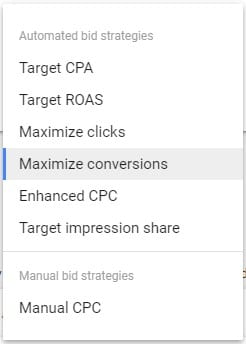
Target CPA
CPA means cost per acquisition.
Cost per acquisition can also have multiple meanings.
For example are you measuring cost per lead or cost per sale, cost per email signup?
Different websites measure it differently and it’s fine to measure any action, just so long as your consistent in your conversion tracking.
To give Google a number to target you will need to try and calculate a cost per acquisition.
For example let’s say your an electrician and each job you do averages about $300.
You know that for each job you do, you need to get three leads from Google.
You work out that for each job your willing to spend $30 so the cost per lead will be $30 divided by 3 or $10.
You would then set your target CPA in Google at $10.
It’s always important to ensure these numbers continue to make sense and part of managing your Google Ads account is to constantly check your data.
For example if the number of leads per job increases then your profitability would fall – if it takes 4 leads to get a job your cost per lead is now $40 instead of $30.
Further if the number of leads per job falls then the cost per job would fall.
You might therefore leave the target CPA at the level to increase the volume of work.
How Target CPA works is you need to have conversion tracking set up on your account correctly which then measures when a Google searcher clicks your ad, visits the conversion page and completes a conversion process (fills in a form, joins an email list or makes a purchase).
However, with Target CPA even though Google asks for a number to target you don’t have to have a conversion value in your tracking data.
You do if you use the next method Target ROAS.
Why you ask? Because Google is just looking for a conversion and then divides the conversions by the total cost to get a cost per acquisition (conversion) vs your target CPA.
As the process is machine driven you need conversions on an ongoing basis so that Google can work out if a Google searcher is likely to convert.
So the bidding strategy is only as good as the data it gets.
If you get little to know conversions each day you will get poor results.
If you already get lots of conversions then you should get a better outcome with this bidding strategy.
Further, if you don’t have it set up conversion tracking correctly, you could lead to overspending or underspending significantly.
Poor data, poor results. Good data, great results.
If your starting out we would recommend not using this strategy until you have at least 5 conversions per day, every day and your conversion tracking code has been setup correctly.
Target ROAS
ROAS stands for return on advertising spend and measures the total conversion value divided by the cost.
Hence, why we said above that you need a conversion value for Target ROAS when you don’t for Target CPA.
Target ROAS is really designed for sites with lots of conversions each day and those that are tracking conversions in multiple formats like phone calls, form fills and sales.
Given this is likely your first campaign we will leave Target ROAS for another blog article.
If you want to read more, Google explains Target ROAS here.
Maximize Clicks
Maximize clicks does exactly as it says and is a great tool to use when starting as it will enable you to get lots of traffic so long as total cost and cost per click are not an objective.
The limitations will be your budget, and if you decide to use it the optional maximum cost per click (Maximum CPC).
Use these to reign in Googles control.
How this works is Google will adjust your bids on keywords to drive a click. If you don’t have a maximum cost per click Google can increase your CPC to any price to win the auction.
However, be wary using this strategy.
It’s great to use initially to get data on keyword costs and what it will cost for paid traffic but you provide Google with a lot of control (especially if you don’t provide a maximum CPC) so be aware and check your data often.
Like any bid strategy you can change it at anytime so our counsel would be, if you decide to use this strategy use it but check daily and once you feel you have the data you need, flip to an alternate strategy.
Maximize Conversions
Maximize conversions focuses on conversions with no CPA, so it will deliver conversions no matter the cost.
You simply choose this bidding strategy and provide no additional information other than have conversion tracking setup.
Like Maximize clicks you provide Google with a lot of flexibility and the only restriction is your budget.
If you have just installed conversion tracking and you are still trying to work out your cost of acquisition this bidding strategy is helpful in trying to find out exactly what your cost is.
However, your goal if you use this should be to move to Target CPA.
So our counsel would be to use this for a period to build an understanding of your CPA and then use the data to change your bidding strategy and set your target CPA.
Enhanced CPC
Enhanced CPC involves manually setting maximum bids for keywords, at the keyword, adgroup or campaign level and then Google will adjust these bids up or down based on the likelihood that a Google Searcher will click your ad.
Enhanced CPC is like a halfway house as you are giving some control to Google with the ability to increase your bid but with limitations.
Also to use this bidding strategy you will need conversion tracking installed.
Like any smart bidding strategy it will only be as good the data it gets.
If you have never used a smart bidding strategy then this can be a good place to start as you can control bidding through keyword maximum bids as well as your budget.
Manual CPC
This is the only bid strategy which you have full control and is a favourite with so called Google Ads Managers who try to justify their skills.
However, unless you are a control freak OR you have time to watch your Google Ads account all day we would not recommend using this strategy.
How it works is you provide a bid for a keyword at the keyword, adgroup or campaign level and Google uses that bid as is, no adjustments or understanding the potential for a click.
However, if you don’t have conversion tracking installed then you can still use this bidding strategy.
Target Impression Share
Target impression share provides you with the ability to target where you want your ads to appear on the page – at the absolute top (ie first position), at the top of the page (top three results of the page) or anywhere on the page could be at the top or bottom.
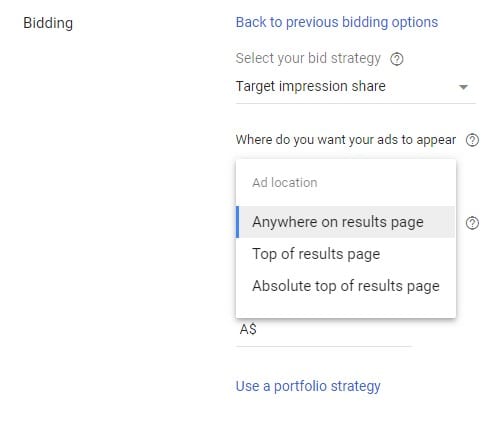
To use this strategy you need to provide a percentage of ads you want to target for the goal you set – anywhere on page, top of page or absolute top.
In addition you need to set a maximum bid price your willing to pay and your budget will also limit clicks.
Using this strategy, especially if you want to target position 1 on the results page will take some refinement and ongoing analysis as you will need to test to ensure your maximum bid is appropriate as your setting this at the campaign or account level (if you use this as a portfolio strategy).
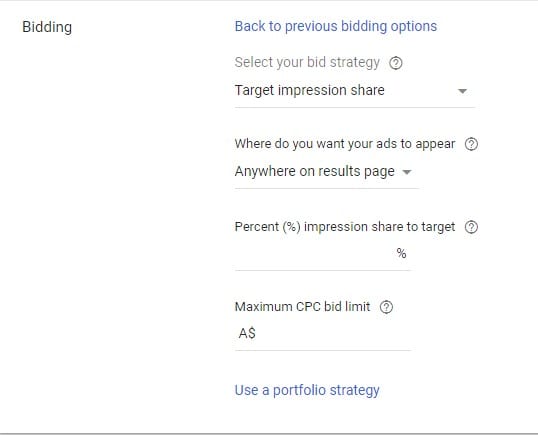
If you don’t have conversion tracking installed and you want to try and get your ads seen as much as possible on the results pages then this can be a good strategy to achieve that.
The downside is that the bidding strategy is not taking into account conversions and not optimising to try and get you more conversions.
Chose a bidding strategy
41. Based on the information we have provided make a choice on the bidding strategy for your campaign. If your still not sure choose Enhance CPC, otherwise read back over to make a firm decision. It can always be changed later.
Conversions
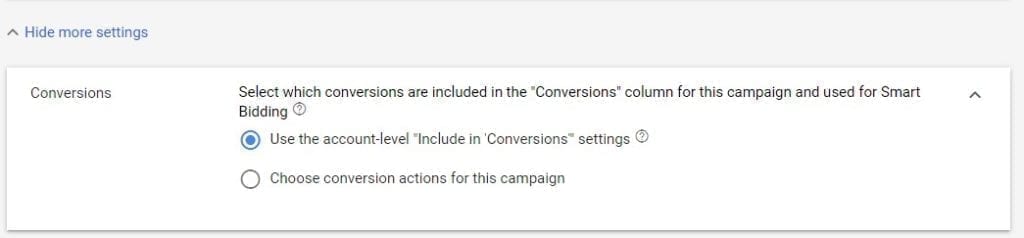
We have talked a bit about conversions so for this choice in setting up your brand campaign we can keep the choice simple.
If you have chosen a bidding strategy that does not use conversions then this choice will not be relevant.
In nearly all circumstances we would choose account level conversions.
42. If you click “Show More Settings” under Bidding you will find the conversions choice. The default is to use account level conversions rather than campaign level. We would leave this at account level.
Ad Schedule

Ad schedule refers to the time of day and days of the week that your Google Ads can be triggered by Google Searchers.
For example you can choose which days your ads run
You can choose at what times during the day your ads run.
To determine what your ad schedule should be you need to ask questions about your own business.
For example, if the goal is to build an email mailing list, you would likely run your ads 24/7.
The same would go if you wanted the conversion to be people to complete a form.
If you have a business where your trying to generate a call to your business then running ads during business hours may make more sense as you want someone to answer the phone.
As we are building a brand campaign so its about awareness, you may want to run your ads for this campaign 24/7 even if your sales process is a phone call as the goal is awareness rather than a phone call.
43. The default is to have ads run 24/7. If you don’t want to do this and want to narrow the times down click “Show More Settings” under bidding and then click “Ad Schedule”. You can now add all days, Monday to Fridays or individual days and times that you want your Google Ads to run.
Ad Rotation
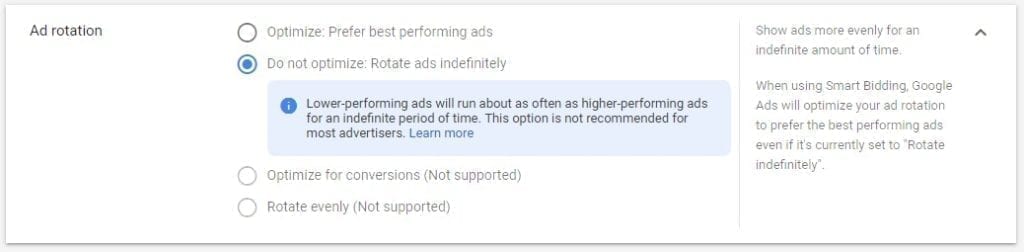
Your Ads in Google Ads are one of the most important factors in your Google Ads account and hence rotation becomes important.
Couple of key issues to contemplate in this discussion
In Google Ads, best practice is to have at least three ads running for a adgroup. Never just have one ad!
Secondly, if you recall the discussion on Quality score under “Bidding Process” and we outlined the three factors that influence Quality score.
Two of those factors are impacted by your Google Ads, Ad Relevance and Expected CTR.
Given how important the Ads you run are, we cannot stress how important it is to review your ads on a regular basis.
So how do we do this?
A very simple way to do this is to write three ads.
Let those ads run with “Ads Rotation” set to “Do Not Optimize” as you want the ads to be show evenly on the Search Engine Results Page to work out which ad gets more clicks than another.
Once each ad has been shown 500 to 1000 impressions you need to stop the worst performing ad of the three and write a new ad.
To determine worst performing we would look at CTR and Conversions if set up.
Depending on how quickly you hit 500 to 1000 impressions will determine how often you should review your ads.
We use this impression rate so that we can see statistically who has won the competition. Shorter competitions may produce some anomalies.
Then you let the competition start again.
And then repeat and repeat and repeat.
This is one of the key activities to running a successful Google Ads campaign.
As we need to determine the winner of the contest, we choose Google to rotate ads evenly rather than optimise.
In theory you should always be looking to write a better ad so this process should run indefinitely.
However, if you can’t do this, we recommend find a good quality Google Ads manager who can do this for you, OR implement software to help you with this (Omologist is building this so stay tuned) OR as a last resort, change Ad Rotation to “Optimize: Prefer Best Performing Ad”.
Just to stress this again, your Ads are one of the keys to a successful campaign so reviewing your ads and trying to continually improve your ads performance is exceptionally important.
44. We hope you read the discussion above and have committed to ongoing review of your Google Ads. Therefore the choice for Ad Rotation would be “Do Not Optimize: Rotate Ads Indefinitely” otherwise choose “Optimize: Prefer best performing ads” OR “Optimize for conversion”.
Ad Extensions
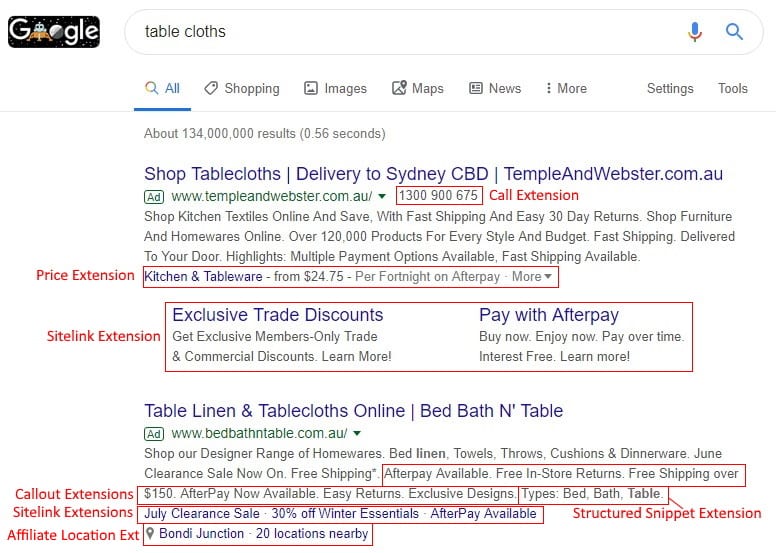
There are a lot of different types of extensions that Google offer and where the type of extension is relevant you should always use extensions.
Extensions will increase your CTR for an ad and Google state in Google Ads that using extensions will increase clicks by 15%.
More importantly, Google now includes the expected impact from “your ad extensions and other ad formats“, so ensuring you have these set up and relevant to your campaign now becomes more important.
We will not cover all extensions, just those that would be relevant for a brand campaign.
Sitelink Extensions
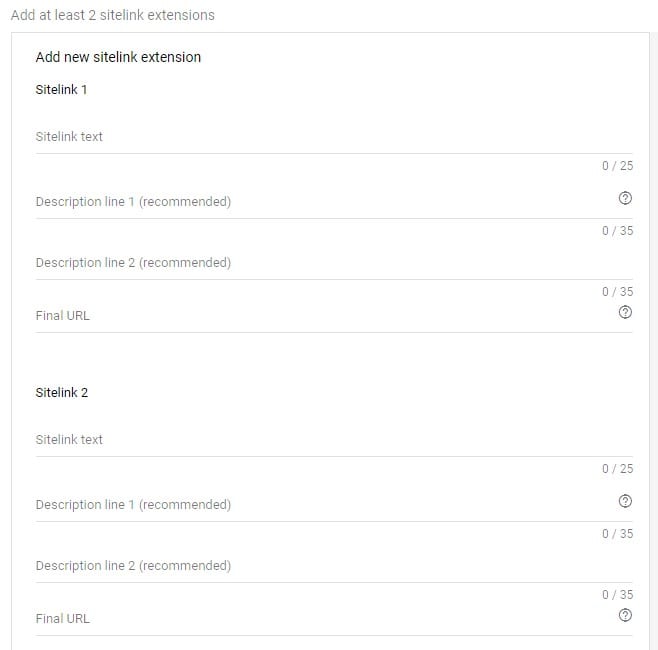
Sitelink extensions are the first and most important extension to setup.
Sitelink extensions allow you to direct customers to specific pages on your website.
At a minimum, Google will usually show 4 so make sure you create a minimum of 4 sitelinks. More if you want to test different sitelinks.
For example About Us, Pricing, Specials, Specific Products, Contact Us, Support, Log In and other pages you might want to direct a potential customer to OR for existing customers to get them to what they are after quickly on your site.
The image above shows the sitelink creation page which provides 25 characters to describe the link and this text will be in a larger bold text.
For example this might be something like “About Us” or “Pricing” for a SAAS site, or “Skirts” or “Tops” or “Sale Items” or “New Stock” for a fashion site.
Next you get two recommended description lines, each of 35 characters and we strongly advise you to use both of these to describe your landing page.
If the landing page is a sales page you can include a short call to action like Buy Now or Learn More or See the latest items.
However, it is optional for Google to show your description text and they will do so only if they feel the description may help to generate a click.
Like any text you type into an ad, ensure that you check your spelling and grammar.
The final URL will be the landing page that you have described.
The main point to make here is that the domain of your URL must be the same as the domain of your ad.
For example if you ad will have the domain www.omologist.com then your sitelink final URL must also be www.omologist.com/AnotherPage
45. Create a minimum of four sitelinks and ensure you use both descriptions to describe the landing pages. The domain you use should be the same as what you will use in ads.
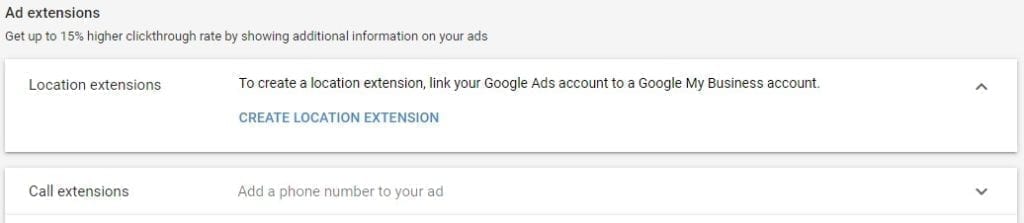
Location Extensions
Location extensions provide a link to your business’s physical address.
This will be important if your business model encourages customers to visit your address such as a shop or office.
However, if for example your a SAAS business like Omologist then the location extension may have less emphasis.
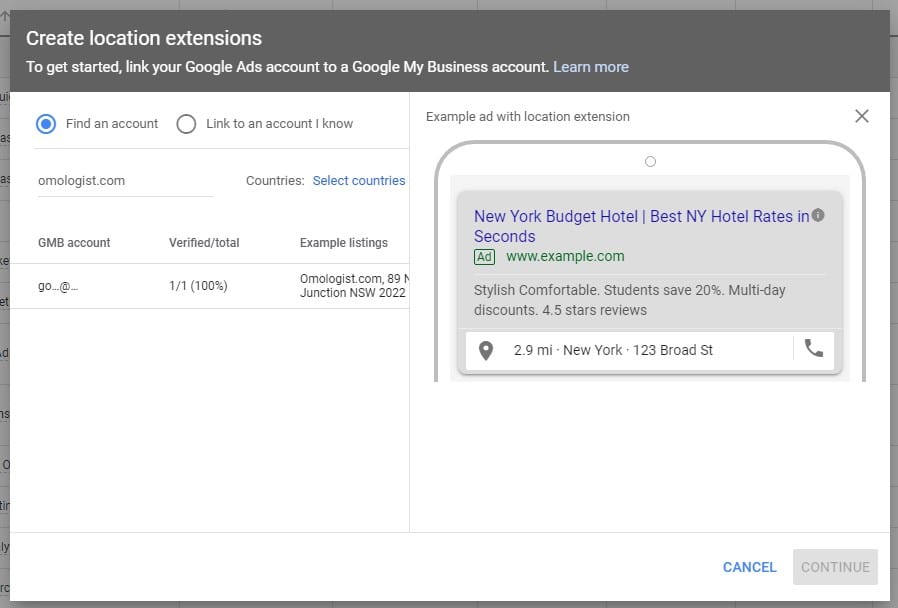
To set up location extensions you will need to first setup a Google My Business Account.
If you do set this up Google will need to go through the process to verify your business and this can take a week or two as they send you a card with a code in the mail.
If you don’t have a Google My Business account and Location Extensions are important we would recommend setting up an account and then coming back to this guide to add location extensions at that time.
46. To set up location extension click the link and go follow the process to link your Google My Business Account and choose the country for your extension.
Call Extension
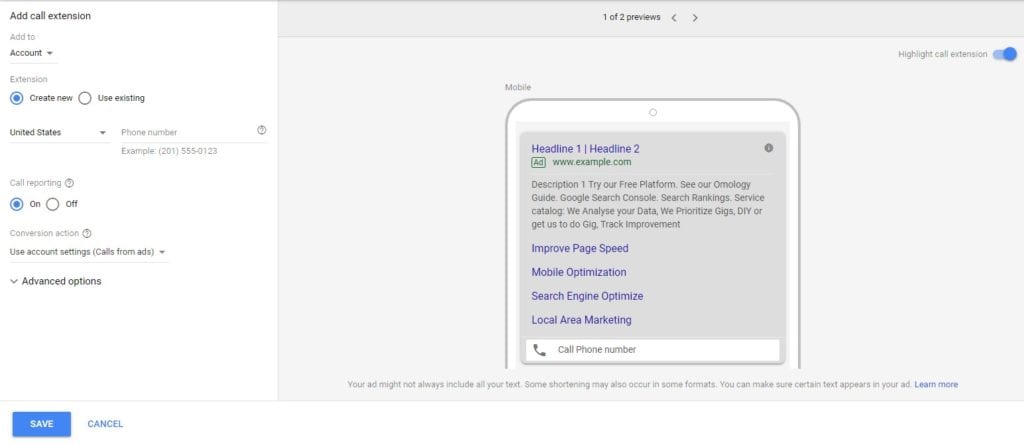
If you business relies on phone calls then setting up call extensions is mandatory.
To enter a call Extension choose the level of your account that you want to set the call extension at (account, Campaign or Ad Group), Choose your country and type your phone number.
The reason your get a choice on the level you want to set up the call extension is so you can determine when you want a call extension to possibly appear.
If your running a special campaign and have a phone number specific for that campaign then you may choose to run that special phone number only for that campaign or adgroup.
Some information on call reporting and tracking.
If you choose call reporting then Google will provide a different number in an ad (call forwarding) that will then go through to your number enabling Google to track that the call was made.
So when a customer clicks the number on an ad, Google will forward that call to your number but will track the call as a click in your Google Ads account helping to determine a conversion.
47. To add a call extension choose your country and type on your phone number. Set call reporting to “Calls from Ads” to track mobile calls.
Callout Extensions
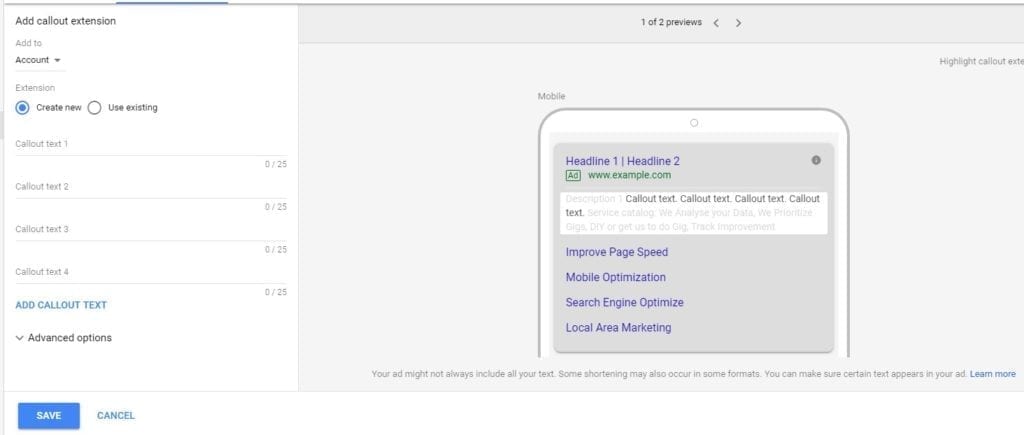
Callout extensions are short 25 character text that can be used to highlight your product, business or service.
We prefer to call callout extension “Benefit Extensions”.
A Benefit is a benefit to your customer (not you) and will likely be a “feature” of your product.
For example a car may have leather seats (feature) but the benefit is “Travel in Luxury”.
Customers don’t buy features they buy benefits and these short call outs provide a great way to highlight these “benefits”, but you need to do it in 25 characters.
So go through the features of your product, business or service and then try and write a “benefit to the customer” in 25 characters for each feature.
You can also use callout extensions to highlight certifications, awards, that your business may have or won.
For example if your a member of a “Builders Association” or have a licence you need to show.
48 Write a minimum of four callout extensions focusing on the “benefits” of your product or service to your customers or on important certifications, licences, awards you may have won.
Structured Snippet Extensions
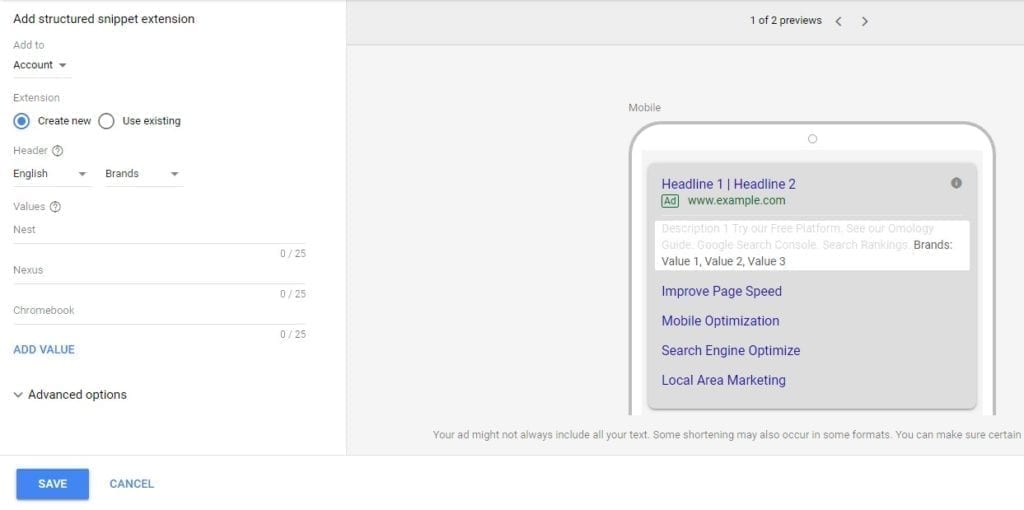
Structured Snippets provide a mechanism to to get across some quick information relevant to your business such as brands your sell, service offering, amenities, styles etc.
So to create a Structured Snippet is easy, you choose a header that is relevant to your business and then add relevant “values” as Google calls them (brands, styles etc).
For example if your a travel agent you might show your most popular destinations. If you sell laptops you might show the brands your sell.
Structured snippets can also be used to show “benefits” as we discussed above in callout extensions.
You can add up to ten for each structured snippet and we would recommend a minimum of four for each.
49. Choose a header from the drop down list and then add at least four “values” relative to the header chosen.
Keywords for my brand campaign. Understanding the different versions.
This is a quick look at the different types of keyword matches.
Google provides five ways to determine the intent of your keywords chosen and then if you ad is displayed.
These are
- Broad
- Modified Broad
- Phrase Match
- Exact Match
- Negative Match
Broad keywords is the default but you should steer clear of using this type of keyword match.
Broad keywords will allow Google to match you keyword with a wide variety of keywords, some which will never match the intent of your keyword.
A broad keyword will include related searches and synonyms so you can end up with your ad being displayed to a broad range of Google Searchers.
For example, lets say your an artist who paints landscapes and you want to use the keyword painter.
The broad use of the word painter can refer to a artist but it can also mean a house painter.
If this example you don’t want to be paying for clicks for people looking for a house painter.
Further if you do use a broad match you will likely lead to lower quality scores as people, if they click may return to Google giving you a poor landing page experience.
Modified broad allows you to tighten up control on a keyword and will limit the variations that they show your ad to misspellings, singular and plural forms, acronyms, and stemmings.
For modified broad we use a “+” before each keyword to flag to Google a modified broad keyword for example like +landscape +artist.
To narrow further we use phrase match and use inverted commas to designate a phrase match such as “landscape artist”.
Phrase match means that they keyword phrase must contain “landscape artist” such as best landscape artist in Australia or find landscape artist in San Francisco.
So with phrase match Google will match the phrase with keywords before or after or with close variants of the phrase.
The last keyword search version if exact match and this means the keyword as the name suggests needs to match exactly.
To do this we use [landscape artist] and your ads in this example would ONLY be show if someone type landscape artist into Google search.
The last keyword type is a negative keyword and this is used to determine of your ad should not be shown.
For example if you did target painter using the example above, you may set [house painter] as a negative keyword so that your ad is not shown to those looking for a house painter.
For negative keywords you can use broad, phrase and exact match types.
So how do I translate this into the keywords I use in my campaign?
For our brand campaign we use a modified broad version because we want to pick up when people might spell our brand wrong but not pick up synonyms.
If you brand is a website we would start with these variations for each Ad Group
- +omologist
- +omologist.com
- +omologist +com
- +www +omologist
- +www +omologist.com
- +www +omologist +com
- +www.omologist
- +www.omologist.com
If you have more than one word in your brand you can add the following
- +brand1 +brand2
SKAGS – Single Keyword Ad Groups
For ALL our campaigns we use single keyword ad groups and this is a good discipline to get into.
By single keyword we mean for any given keyword, but not the type as that would be in the same Ad Group.
For example for the keyword phrase “study of omology” we would have a single Ad Group for +study +of +omology, “study of omology” and [study of omology]. So three types of keyword matching in the single Ad Group.
If we wanted to target a new keyword such as “omology is the study of marketing” then the three types of matches for this keyword would be created in a new Ad Group.
So why use Single Keyword Ad Groups (SKAGS)?
The goal is to maximise the components of quality score – Expected CTR, land page experience and ad relevance.
A high quality score should lead to lower cost, higher CTR, more conversions and more sales so taking the time to set up your Ad Groups correctly will reap benefits in the future.
Given the way Google is constructed when you write ads, the ad can be shown to EVERY keyword in an Ad Group.
Let’s say I put two keywords in an Ad Group, landscape painter and heating specialist.
Once we create ads it would be very hard to create an ad that is relevant to both a landscape painter and a heating specialist.
Further we will want to tailor the landing page for the keyword to be relevant to either a landscape painter or heating specialist, not both.
By focusing our ads and keywords in each Ad Group we get a targeted Ad relevant to the keyword and landing page and the Expected CTR should score above average.
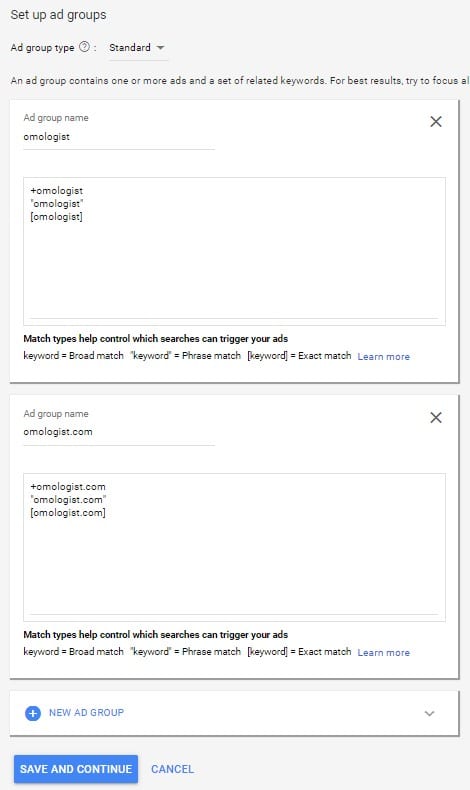
50. Time to setup your Ad Groups and Keywords. Name each adgroup based on the keyword and then add the modified broad, phrase match and exact match versions of your keyword (see examples above) and keep adding Ad Groups until you have a Ad Group for each keyword.
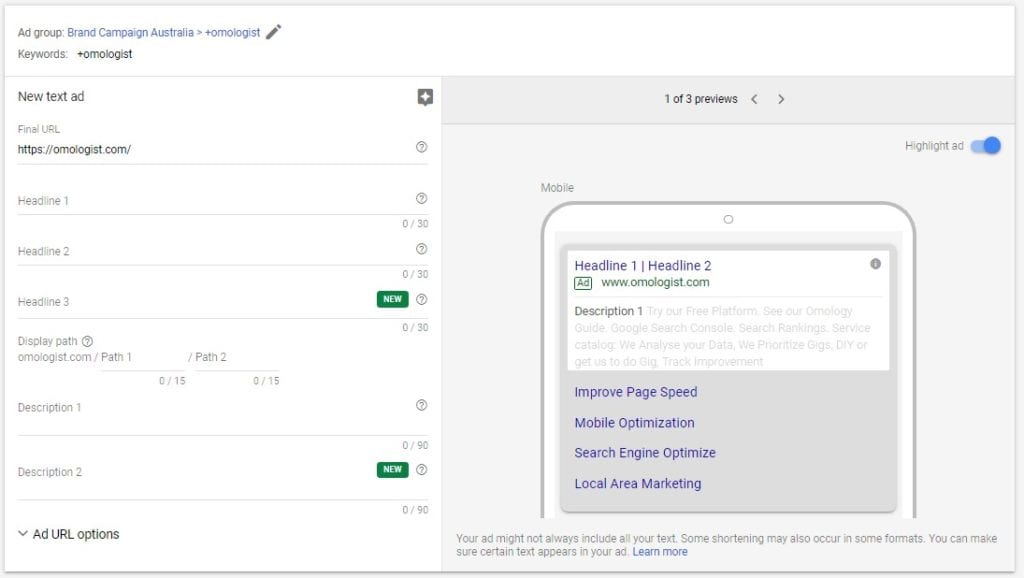
Writing Your First Ads
Writing Ads is a key function of a successful Google Ads campaign so we will cover just some of the basics to get you started.
Final URL
The Final URL is the landing page you want your customer who clicks the Google Ad to land on.
For a brand campaign this will likely be your home page unless you build a specific page.
51. Type in the URL you want to use for this keyword or keyword phrase.
Headlines
Headline 1, 2 and 3 provide you with 30 characters each to write three headlines that attract the Google Searcher and entice them to click your ad.
Ensure your ad is focused on the intent of the searcher which in this example will be your brand.
Ensure at least one Headline uses the keyword you are targeting – for us this is Omologist.
Other tips would be to use power words such as Best, Top, Leading, etc.
If you offer a discount show discount such as 15% off.
Use emotion such as “Don’t impact your Health” to try and convey the issue.
To get ideas for Brands ads you can also review some of your competitors and leading brands by typing their brand into Google and see if they run an ad.
52. Create three unique headlines each up to 30 characters long and ensure that at least one uses the brand keyword.
Display Path
The display path is very useful for reiterating the keyword for the Ad Group and also helps to ensure that the Ads in the Ad Group relate directly to the keyword phrase being targeted helping your ad relevance score in quality score.
You will see Path 1 and Path 2 which can both be replaced but are each limited to 15 characters.
In Path 1 type in your keyword. So for us we would type in Omologist.
You would only need to use Path 2 if you have two or more keywords in your keyword phrase.
As a rule, if we had a two word keyword we would try and get this into the Path 1 together such as mould removal in the example below.

We prefer this as it looks cleaner to the eye and ensures the keyword phrase is not broken with the forward slash.
However, if your keyword phrase is long such as digital marketing we would do this over path 1 and path 2

If your targeting a long tail keyword phrase just use the main keywords in the phrase in path 1 and path 2.
53. Use your keyword/keyword phrase in path 1 and path 2.
Descriptions
If someone is typing your brand into Google they generally know who you are so make it easy for the searcher to find what they are looking for and get to that page on your site quickly using extensions or your main URL.
Once you have your three headlines you need to write two 90 character descriptions that describe further your value proposition and you should always include a call to action such as Learn More, Call Now, Get Started, Buy It Today etc.
54. Write two 90 characters descriptions each with a call to action at the end.
Once you have completed three ads for a keyword your will then need to repeat the process for each Ad Group.
Yes I know this sounds a little counterintuitive but the goal in addition to writing a great ad is to ensure the use of keywords as we flagged above in at least one headline and in the display path so as to focus on the keyword of the Google searcher and try and improve your ad relevance score for each Ad Group.
55. Once you have at least three ads written for each Ad Group click the save and continue at the bottom of the page.
56. On this last page you can review some of the decisions we have made and once happy, click continue to campaign.
Your campaign is now ready to run.
If at any stage you want to change anything you can with Google Ads.
Just go to the relevant section above and we can talk through the decisions to make.
Conclusion
So thats my guide to helping you set up your first Google Ads Brand campaign.
Now it’s your turn.
We would love to hear your comments and questions.
Do you have a question about the content or something we missed or want to know more ask in the comments below.
If you have feedback we welcome that as well especially if we can make this article better.